
 |
 |
 |
 |
 |
 |
 |
 |
 |
 |
 |
 |
 |
||||||||||||
 |
|
|
|
 |
  Rotating a 3D cube Rotating a 3D cube[ July 13, 2004 ] by Eric Lin Basic 3D in Flash: 2/5 In this second article, the author shows how to create a rotating 3D cube, with textured surfaces. |
||||||||||||||||||||||||||
This is 3d movie, so the first step is to setup 8 points 3d data to represent a cube in 3D. 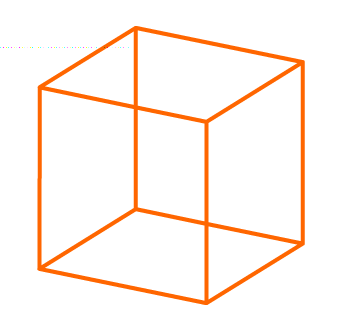 // top face
p0 = {x:-50, y:-50, z:-50};
p1 = {x:50, y:-50, z:-50};
p2 = {x:50, y:-50, z:50};
p3 = {x:-50, y:-50, z:50};
// botton face
p4 = {x:-50, y:50, z:-50};
p5 = {x:50, y:50, z:-50};
p6 = {x:50, y:50, z:50};
p7 = {x:-50, y:50, z:50};
pointArray = [p0, p1, p2, p3, p4, p5, p6, p7];
// p0 to p8 , the 3d points of a cube;
There is no perspective effect, so to render a 3D data, we just let z off. These 8 points construct into a cube that has 6 faces. So, we need 6 skewing movieClip to cover them. In fact, before we can cover these 6 faces with pictures, for practise, we can try to use 6 square dark clip to cover these 6 faces. Later, we just attach graphics to the dark squares to make them texturized. clipArray = new Array();
for (k = 0; k < 6; k++)
{
duplicateMovieClip (obj, "obj"+k, k+1);
var clip = _root["obj"+k];
clip.mc.holder.attachMovie("mv"+k, "mov", 1);
clipArray[k] = clip;
}
Well, if you don't know how to skew a square to conform 3 corners of a quadrangle, you should check the tutorial about skewing. Ok, if you understand what I said, you should try making a cube now. Make 6 faces to cover the 6 faces of the cube. Next step, I will briefly explain the math about "rotation" of 3d data.
It returns a point data format {x:??,y:?/} which is the new coordinates data. center = {x:0, y:0, z:0};
function rotateZ (x1, y1, center, dAngle)
{
var dy = y1-center.y;
var dx = x1-center.x;
var orgAngle = Math.atan2(dy, dx);
var hypo = Math.sqrt(dy*dy+dx*dx);
var newAngle = orgAngle+dAngle*(Math.PI/180);
var xx = hypo*Math.cos(newAngle)+center.x;
var yy = hypo*Math.sin(newAngle)+center.y;
var pt = {x:xx, y:yy};
return pt;
}
The above equation is a rotation in 2D plane. It is useful when we do rotation in 2D. It also can be applied to 3D plane. Well, we need to extend this function a little. We need batch rotate a bunch of points data. In this case, we need rotate 8 points data. So, I would call it 8 times. Also, we need the rotation along Y or X axis. The equation is simply difference of x,y,z. function groupRotateZ (pointArray, dAngle)
{
for (k = 0; k < pointArray.length; k++)
{
var pt = rotateZ(pointArray[k].x, pointArray[k].y, _root.center, dAngle);
pointArray[k].x = pt.x;
pointArray[k].y = pt.y;
}
}
function groupRotateY (pointArray, dAngle)
{
for (k = 0; k < pointArray.length; k++)
{
var pt = rotateZ(pointArray[k].z, pointArray[k].x, _root.center, dAngle);
pointArray[k].z = pt.x;
pointArray[k].x = pt.y;
}
}
function groupRotateX (pointArray, dAngle)
{
for (k = 0; k < pointArray.length; k++)
{
var pt = rotateZ(pointArray[k].z, pointArray[k].y, _root.center, dAngle);
pointArray[k].z = pt.x;
pointArray[k].y = pt.y;
}
}
So, we setup 8 points. We skew 6 square clips to cover the 6 faces of the cube. This is updated when we rotate these 8 points data along x,y or z axis. Later, we make it fancy by adding shadow according to Z data and attaching pictures to the square movieClips. If you can do a rotating grey cube, then it is finished. This is the final result, with textured faces: Download the source code | ||||||||||||||||||||||||||

|
||||||||||||||||||||||||||
|
