|
 |
 |
 |
 |
 |
 |
 |
 |
 |
 |
 |
 |
||||||||||||
 |
|
|
|
 |
  ActionScript 2: applying theory to a game prototype ActionScript 2: applying theory to a game prototype[ December 22, 2003 ] by Marco Lapi, a.k.a Lapo In this article Lapo discusses the new features of Actionscript 2.0 and how they can be used to better organize the code in a game / game engine. If you're totally new to this topic we would reccomend you to stop here and go back to Joey Lott's introduction to AS 2.0 before starting with this one. |
||||||||||||||||||||||||||
Download the source code of this prototype INTRO The most significant change in Actionscript 2.0 is the introduction of classes for the creation of objects, making the language a lot more similar to C++ and Java. Also other keywords such as "interface", "implements" and "extends" are now part of the language making the old prototype chain something a bit obsolete. In this tutorial we will give you an example of how to use classes to define extensible datatypes that help you better organize your code in a game project. LET'S DIVE IN The first thing we should start with, is creating a Sprite class. A sprite class should encapsulate all the basic informations (or objects) that define the most simple and re-usable sprite implementation for our game:
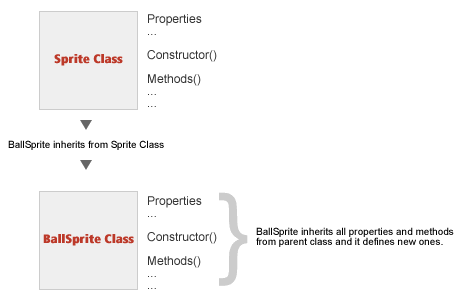
Based on this generic implementation of a sprite we can extend it and create more specialized objects that are needed in our game: for example we will need a ball sprite that will have a speed value and also two direction values for the X and Y movements.
Picture 1 Here follows the code for the sprite class: class Sprite
{
private var _mc:MovieClip
private var _isActive:Boolean
/*
Constructor
*/
function Sprite(timeline:MovieClip, sourceMc:String, px:Number, py:Number, isActive:Boolean)
{
/*
Initialize the level counter
*/
if (_global.lvl == undefined)
_global.lvl = 0
_mc = timeline.attachMovie(sourceMc, "sprite_" + _global.lvl, _global.lvl)
_mc._x = px
_mc._y = py
_isActive = isActive
if (!_isActive) _mc._visible = false
_global.lvl++
}
public function getClip():MovieClip
{
return _mc
}
public function collides(sp:Sprite):Boolean
{
return _mc.hitTest(sp.getClip())
}
/*
Getter / Setter for _isActive property
*/
public function get isActive():Boolean
{
return _isActive
}
public function set isActive(flag:Boolean):Void
{
_isActive = flag
if (_isActive)
_mc._visible = true
else
_mc._visible = false
}
public function get x():Number
{
return _mc._x
}
public function get y():Number
{
return _mc._y
}
public function set x(x:Number):Void
{
_mc._x = x
}
public function set y(y:Number):Void
{
_mc._y = y
}
public function getWidth():Number
{
return _mc._width
}
public function getHeight():Number
{
return _mc._height
}
}
After the Class declaration we start creating two private properties: a moviclip that will store a reference to an on stage movieclip and a boolean value that controls the sprite status (active/inactive). Next we move on the constructor method. As you may already know this "special" method is always public and it doesn't have
The next 2 lines create a _global value to keep track of the level number to pass to the attachMovie function. Once the constructor is setup we define a public method called getClip() that simply returns a reference to the sprite movieclip. Next we have a method called collides() that checks if a collision has occured with another sprite using the built-in hitTest method. GETTERS / SETTERS From this point, the rest of the code is just made up of getter/setter couples that handle reading and writing of the other private members. Please take a look to the _isActive property and to its getter/setter methods: what we have here is a private variable that is not accessible directly from outside the class, while the two methods expose a variable called isActive (no underscore) that works externally as a public member and internally as methods. Say you have a Sprite object called sp, if you try this: sp._isActive = true you'll get a compiler error since you're trying to access a private var from outside the object. Now analyze this code: sp.isActive = true output >> true In the first line the setter is invoked and the private member is set, while in the second line the getter method is invoked and the value of _isActive is returned. As you may have noticed the advantages of this approach is that you can validate the input values, filtering unwanted data and also provide more complex functionalities when a certain member is set. INHERITANCE Now we can create the BallSprite class and see what is going on with the inheritance. class BallSprite extends Sprite
{
private var _speed:Number
private var _dx:Number
private var _dy:Number
/*
Class Constructor
*/
function BallSprite(timeline:MovieClip, sourceMc:String,
px:Number, py:Number, isActive:Boolean, sp:Number)
{
super(timeline, sourceMc, px, py, isActive)
if (sp >= 0 && sp <= 10)
_speed = sp
else
_speed = 5
dx = 1
dy = -1
}
/*
_speed getter/setter
*/
public function get speed():Number
{
return _speed
}
public function set speed(sp:Number):Void
{
if (sp >=0 && sp <= 10)
_speed = sp
}
/*
_dx getter/setter
*/
public function get dx():Number
{
return _dx
}
public function set dx(d:Number):Void
{
if (Math.abs(d) == 1)
_dx = d
}
/*
_dy getter/setter
*/
public function get dy():Number
{
return _dy
}
public function set dy(d:Number):Void
{
if (Math.abs(d) == 1)
_dy = d
}
}
The BallSprite class extends the functionalities of our generic Sprite class by adding three new private members that represent speed, x direction and y direction respectively (directions are expressed with a value of 1 if positive or a value of -1 if negative). If you analyze the constructor function you'll notice that it requires more parameters than the parent class: the first 5 values are sent to the parent constructor while the new ones are handled by the BallSprite class. What is going on here is very simple: the keyword super() invokes the parent class constructor so that you don't have to re-write the same code in the extended class. In other words the parameters that are in common with the parent class are handled by the parent constructor and the BallSprite class just handles the new ones. This is what code reusability is about! The rest of the code is just getter/setter methods for the new private memebers. THE GAME At this point we have created a generic Sprite class that we'll use for the "paddle" and a more specialized BallSprite class that extends the former. Open the source .fla file and take a look at the code inside the 1st frame: we instantiate a new Sprite and a new BallSprite objects passing "this" as the timeline to attach the moviclips to. The ball sprite is given random X and Y position. Then a simple mouse listener is setup to catch the mouse position and move the paddle accordingly and an onEnterFrame CONCLUSIONS I can agree with the many flash developers who complained about the fact that Flash MX 2004 didn't bring much news to game development. However Actionscript 2.0 can have a huge impact in better code organization and design: classes make inheritance and polymorfism easier to understand and Java/C++ programmers will find AS2 very familiar. Take some time with this examples and try to experiment on your own with these concept that may be new for some of you. If you have any questions about this article, please post them in the forums.
|
||||||||||||||||||||||||||

|
||||||||||||||||||||||||||
|